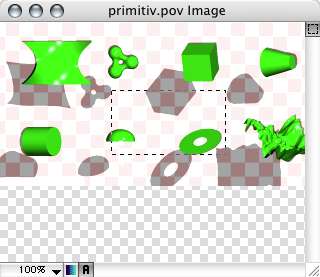
4.4.3 Render Preview Window
The Render Preview Window shows the final image being rendered. There will be one Preview Window for each scene,
but there cannot be multiple Preview Windows for one scene.

The Selection toggle in the upper right can be on (shown above) or off. When it is on, you can drag out a selection
area on the Preview Window, and the next time you render, just that selected area will be rendered. To turn this
feature off and render the whole image, click the Selection toggle to turn it off. Also with the selection mode off,
you can drag the image itself out of the window and drop it as a clipping onto the desktop, or into another image
application that expects PICTs to be dropped into it directly. If the selection mode is on, you can hold down the
shift key and drag the selected area out as a PICT clipping.
The Alpha-channel toggle in the lower left can be on (shown above) or off. When it is on, any part of the scene
that has partial or full alpha-channel transparency will be displayed as a grayscale checkerboard showing through the
scene. Leaving this feature on can slow down display and rendering somewhat. To turn this feature off, click the
Alpha-channel Toggle to turn it off.
The Dither toggle in the lower left can be on or off (shown above). If it is on, the image will be dithered to the
screen. This is most useful if you only have a 256 color or thousands of colors display. The image colors will be
"smoothed", and not look blocky and banded. If you have you monitor set to millions of colors, you can leave
this off, as it will not change the display at all. Leaving dithering off also can speed up the display somewhat.
The Image Size popup lets you change the displayed size of the image. Note that this does not change the size of
the final saved image file, just how you see it on the screen. The popup menu lets you choose from several different
sizes.
There are some shortcuts to setting certain image sizes. Holding down the control and command keys while pressing
the 1, 2, 3, or 4 keys will change the image size to 100%, 200%, 300%, or 400%. You can now scroll the image window
with the arrow keys. Holding down the shift key while arrow-scrolling will scroll faster.
Note: If you choose a percentage less than 100% in the Preview Window's Image Size popup menu, then
POV-Ray will not be able to display every pixel as it is rendered, since each dot is now smaller than a pixel.
Instead, POV-Ray will refresh the entire window every few minutes or so.
|


