|
 |
The prism is essentially a polygon or closed curve which is swept along a linear path. We can imagine the shape so
swept leaving a trail in space, and the surface of that trail is the surface of our prism. The curve or polygon making
up a prism's face can be a composite of any number of sub-shapes, can use any kind of three different splines, and can
either keep a constant width as it is swept, or slowly tapering off to a fine point on one end. But before this gets
too confusing, let's start one step at a time with the simplest form of prism. We enter and render the following POV
code (see file prismdm1.pov).
  #include "colors.inc"
  background{White}
  camera {
    angle 20
    location <2, 10, -30>
    look_at <0, 1, 0>
  }
  light_source { <20, 20, -20> color White }
  prism {
    linear_sweep
    linear_spline
    0, // sweep the following shape from here ...
    1, // ... up through here
    7, // the number of points making up the shape ...
    <3,5>, <-3,5>, <-5,0>, <-3,-5>, <3, -5>, <5,0>, <3,5>
    pigment { Green }
  }
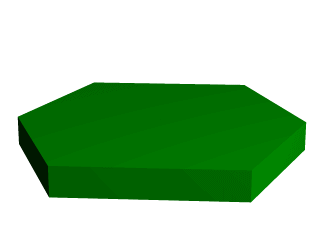
This produces a hexagonal polygon, which is then swept from y=0 through y=1. In other words, we now have an
extruded hexagon. One point to note is that although this is a six sided figure, we have used a total of seven points.
That is because the polygon is supposed to be a closed shape, which we do here by making the final point the same as
the first. Technically, with linear polygons, if we did not do this, POV-Ray would automatically join the two ends
with a line to force it to close, although a warning would be issued. However, this only works with linear splines, so
we must not get too casual about those warning messages!
1.3.1.3.1 Teaching An Old Spline New Tricks
If we followed the section on splines covered under the lathe tutorial (see section "Understanding
The Concept of Splines"), we know that there are two additional kinds of splines besides linear: the
quadratic and the cubic spline. Sure enough, we can use these with prisms to make a more free form, smoothly curving
type of prism.
There is just one catch, and we should read this section carefully to keep from tearing our hair out over
mysterious "too few points in prism" messages which keep our prism from rendering. We can probably guess
where this is heading: how to close a non-linear spline. Unlike the linear spline, which simply draws a line between
the last and first points if we forget to make the last point equal to the first, quadratic and cubic splines are a
little more fussy.
First of all, we remember that quadratic splines determine the equation of the curve which connects any two points
based on those two points and the previous point, so the first point in any quadratic spline is just control point
and will not actually be part of the curve. What this means is: when we make our shape out of a quadratic spline, we
must match the second point to the last, since the first point is not on the curve - it is just a control point needed
for computational purposes.
Likewise, cubic splines need both the first and last points to be control points, therefore, to close a shape made
with a cubic spline, we must match the second point to the second from last point. If we do not match the correct
points on a quadratic or cubic shape, that is when we will get the "too few points in prism" error. POV-Ray
is still waiting for us to close the shape, and when it runs out of points without seeing the closure, an error is
issued.
Confused? Okay, how about an example? We replace the prism in our last bit of code with this one (see file prismdm2.pov).
  prism {
    cubic_spline
    0, // sweep the following shape from here ...
    1, // ... up through here
    6, // the number of points making up the shape ...
    < 3, -5>, // point#1 (control point... not on curve)
    < 3,  5>, // point#2  ... THIS POINT ...
    <-5,  0>, // point#3
    < 3, -5>, // point#4
    < 3,  5>, // point#5 ... MUST MATCH THIS POINT
    <-5,  0>  // point#6 (control point... not on curve)
    pigment { Green }
  }
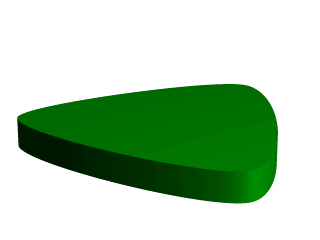
This simple prism produces what looks like an extruded triangle with its corners sanded smoothly off. Points two,
three and four are the corners of the triangle and point five closes the shape by returning to the location of point
two. As for points one and six, they are our control points, and are not part of the shape - they are just there to
help compute what curves to use between the other points.
1.3.1.3.2 Smooth Transitions
Now a handy thing to note is that we have made point one equal point four, and also point six equals point three.
Yes, this is important. Although this prism would still be legally closed if the control points were not what we have
made them, the curve transitions between points would not be as smooth. We change points one and six to <4,6>
and <0,7> respectively and re-render to see how the back edge of the shape is altered (see file prismdm3.pov).
To put this more generally, if we want a smooth closure on a cubic spline, we make the first control point equal to
the third from last point, and the last control point equal to the third point. On a quadratic spline, the trick is
similar, but since only the first point is a control point, make that equal to the second from last point.
1.3.1.3.3 Multiple Sub-Shapes
Just as with the polygon object (see section "Polygon Object")
the prism is very flexible, and allows us to make one prism out of several sub-prisms. To do this, all we need to do
is keep listing points after we have already closed the first shape. The second shape can be simply an add on going
off in another direction from the first, but one of the more interesting features is that if any even number of
sub-shapes overlap, that region where they overlap behaves as though it has been cut away from both sub-shapes. Let's
look at another example. Once again, same basic code as before for camera, light and so forth, but we substitute this
complex prism (see file prismdm4.pov).
  prism {
    linear_sweep
    cubic_spline
    0,  // sweep the following shape from here ...
    1,  // ... up through here
    18, // the number of points making up the shape ...
    <3,-5>, <3,5>, <-5,0>, <3, -5>, <3,5>, <-5,0>,//sub-shape #1
    <2,-4>, <2,4>, <-4,0>, <2,-4>, <2,4>, <-4,0>, //sub-shape #2
    <1,-3>, <1,3>, <-3,0>, <1, -3>, <1,3>, <-3,0> //sub-shape #3
    pigment { Green }
  }
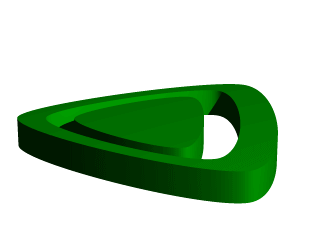
For readability purposes, we have started a new line every time we moved on to a new sub-shape, but the ray-tracer
of course tells where each shape ends based on whether the shape has been closed (as described earlier). We render
this new prism, and look what we have got. It is the same familiar shape, but it now looks like a smaller version of
the shape has been carved out of the center, then the carved piece was sanded down even smaller and set back in the
hole.
Simply, the outer rim is where only sub-shape one exists, then the carved out part is where sub-shapes one and two
overlap. In the extreme center, the object reappears because sub-shapes one, two, and three overlap, returning us to
an odd number of overlapping pieces. Using this technique we could make any number of extremely complex prism shapes!
1.3.1.3.4 Conic Sweeps And The Tapering Effect
In our original prism, the keyword linear_sweep is actually optional. This is the default sweep
assumed for a prism if no type of sweep is specified. But there is another, extremely useful kind of sweep: the conic
sweep. The basic idea is like the original prism, except that while we are sweeping the shape from the first height
through the second height, we are constantly expanding it from a single point until, at the second height, the shape
has expanded to the original points we made it from. To give a small idea of what such effects are good for, we
replace our existing prism with this (see file prismdm4.pov):
  prism {
    conic_sweep
    linear_spline
    0, // height 1
    1, // height 2
    5, // the number of points making up the shape...
    <4,4>,<-4,4>,<-4,-4>,<4,-4>,<4,4>
    rotate <180, 0, 0>
    translate <0, 1, 0>
    scale <1, 4, 1>
    pigment { gradient y scale .2 }
  }
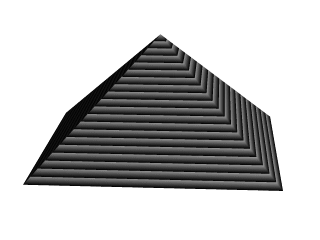
The gradient pigment was selected to give some definition to our object without having to fix the lights and the
camera angle right at this moment, but when we render it, what have we created? A horizontally striped pyramid! By now
we can recognize the linear spline connecting the four points of a square, and the familiar final point which is there
to close the spline.
Notice all the transformations in the object declaration. That is going to take a little explanation. The rotate
and translate are easy. Normally, a conic sweep starts full sized at the top, and tapers to a point at y=0, but of
course that would be upside down if we are making a pyramid. So we flip the shape around the x-axis to put it right
side up, then since we actually orbited around the point, we translate back up to put it in the same position it was
in when we started.
The scale is to put the proportions right for this example. The base is eight units by eight units, but the height
(from y=1 to y=0) is only one unit, so we have stretched it out a little. At this point, we are probably thinking,
"why not just sweep up from y=0 to y=4 and avoid this whole scaling thing?"
That is a very important gotcha! with conic sweeps. To see what is wrong with that, let's try and put it into
practice (see file prismdm5.pov). We must make sure to remove the scale statement, and then replace the
line which reads
1, // height 2
with
4, // height 2
This sets the second height at y=4, so let's re-render and see if the effect is the same.
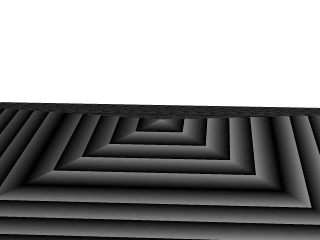
Whoa! Our height is correct, but our pyramid's base is now huge! What went wrong here? Simple. The base, as we
described it with the points we used actually occurs at y=1 no matter what we set the second height for. But if we do
set the second height higher than one, once the sweep passes y=1, it keeps expanding outward along the same lines as
it followed to our original base, making the actual base bigger and bigger as it goes.
To avoid losing control of a conic sweep prism, it is usually best to let the second height stay at y=1, and use a
scale statement to adjust the height from its unit size. This way we can always be sure the base's corners remain
where we think they are.
That leads to one more interesting thing about conic sweeps. What if we for some reason do not want them to taper
all the way to a point? What if instead of a complete pyramid, we want more of a ziggurat step? Easily done. After
putting the second height back to one, and replacing our scale statement, we change the line which reads
0, // height 1
to
0.251, // height 1
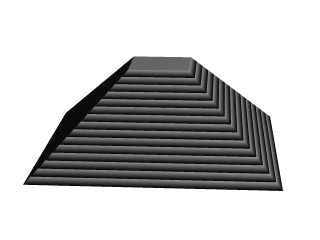
When we re-render, we see that the sweep stops short of going all the way to its point, giving us a pyramid without
a cap. Exactly how much of the cap is cut off depends on how close the first height is to the second height.
|
 |


